AppWorx安装指南
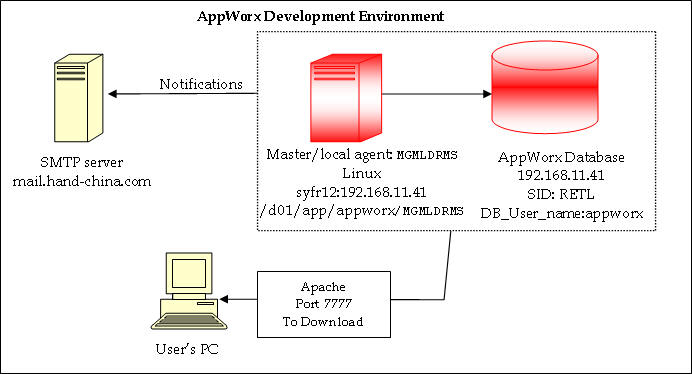
1. 当前AppWorx结构图
1. 安装AppWorx前准备
1.1. 创建UNIX帐户
如果要在UNIX系统中安装AppWorx,首先要创建一个用户作为安装和管理A ppWorx系统的用户。本次安装直接采用数据库安装用户oracle。
1.2. 创建Oracle数据库用户
安装最低需求
1) ORACLE版本:Oralce8i(8.1.7),Oracle9i(9.2.03),Oracle 10G
2) Shared_pool_size: 20M
3) 索引和表空间:150M
4) Processes:100个
基于规则的优化模式(Oracle8i、Oracle9i)
AppWorx在基于规则的优化模式下,具有更好的性能。如果在一个高负载的情况,必须运行在基于规则的优化模式下。
创建用户脚本 (使用sys用户运行)
create user appworx
identified by appworx
default tablespace RETEK_DATA
temporary tablespace TEMP
profile DEFAULT
quota unlimited on lob_data
quota unlimited on retek_data
quota unlimited on retek_index;
grant select on v_$session to appworx;
grant select on v_$lock to appworx;
grant select on v_$locked_object to appworx;
grant select on v_$sqltext_with_newlines to appworx ;
grant select on V_$SQLTEXT to appworx ;
grant create view to appworx;
grant create procedure to appworx;
grant create trigger to appworx;
grant create table to appworx;
grant create database link to appworx;
ALTER SYSTEM FLUSH SHARED_POOL;
grant execute on dbms_sql to appworx;
grant execute on dbms_pipe to appworx;
grant execute on dbms_lock to appworx;
grant execute on dbms_output to appworx;
grant alter session to appworx;
grant create synonym to appworx;
grant create public synonym to appworx;
grant create session to appworx;
grant create sequence to appworx;
grant create materialized view to appworx;
— Grant/Revoke role privileges
grant developer to appworx;
grant select_catalog_role to appworx;
删除用户脚本
如果需要DROP用户,需要先Drop 数据库pipe;否则,在你重新安装之前,必须重启数据库。
— 使用 appworx用户运行
DECLARE
ret NUMBER;
BEGIN
dbms_pipe.purge(user|| ‘pipe_master’ );
ret := dbms_pipe.remove_pipe(user|| ‘pipe_master’);
END;
— 使用sys用户运行
ALTER SYSTEM FLUSH SHARED_POOL;
drop user appworx cascade;
1.3. 安装Oracle数据库客户端
本次直接采用数据库客户端
ORACLE_HOME=/d01/app/oracle/product/10.2.0/db_1
export ORACLE_HOME
ORACLE_SID=RETL
export ORACLE_SID
1.4. 安装JAVA
查看Java版本
安装AppWorx需要Java 1.4.2及以上的运行环境,如果当前的Java版本不够,或不支持java –jar 运行参数,请重新安装。以下语句可查看JAVA版本。
java -version
重新安装
在V7子目录下运行如下脚本可完成JAVA的安装,安装到/d01/d01/java
. jinstall.sh
替换/usr/bin/java的符号链接
rm /usr/bin/java
ln –s /d01/d01/java/bin/java /usr/bin/java
2. 安装AppWorx
2.1. 安装步骤
以下操作使用用户:oracle
上传文件
上传安装文件到如下目录:
/d01/d01/AppWorx70
创建安装目录appworx
mkdir /d01/app/appworx
cd /d01/app/appworx
mkdir MGMLDRMS
cd MGMLDRMS
设置环境变量
ORACLE_HOME=/d01/app/oracle/product/10.2.0/db_1
export ORACLE_HOME
ORACLE_SID=RETL
export ORACLE_SID
PATH=$PATH:$ORACLE_HOME/bin
开始安装
. /d01/d01/AppWorx70/V7/CDINST.SH
安装参数
| Server Name | O/S | AppWorx Node | AW Version | Agent Type | Application |
| syfr12 | Linux | MGMLDRMS | 7.0.2 | Master |
Master Installation
AppWorx Linux User: oracle
AppWorx Directory: /d01/app/appworx/MGMLDRMS
Installation Files: /d01/d01/AppWorx70/V7
Master name =MGMLDRMS
Master’s IP address or DNS name = 192.168.11.41
AppWorx’s Oracle Login = appworx
AppWorx Oracle Instance Name (SID) = RETL
Oracle Instance IP or DNS name Address = 192.168.11.41
Oracle Listener Port = 1521
Oracle Version = 102030
Time of start of Virtual day = 00:00
Time Zone = PRC
smtp_host = mail.hand-china.com
smtp_port = 25
smtp_email = xiaojun.shen@hand-china.com
AwComm Port Number = 2136
Master require it’s own RMI server = Y
Apache Web Server installed on this machine = Y
Full path of the Apache Directory = /d01/app/oracleas/OraHome_1/Apache/Apache
Port the web server listens on = 7777
Location of Web Directory = /d01/app/appworx
IP address or DNS name of this computer = 192.168.11.41
Rmi Registry Port Number = 5099
Enable SSL Encryption = Yes
Enable Master/Java Agent SSL Encryption = Y
Firewall installed = N
Enable RmiServer Debug = No
Configuration Files
$AW_HOME /site/awenv.ini
$AW_HOME /data/keyfile.ini
$AW_HOME /web/classes/Options.properties
$AW_HOME /data/Masters.properties
/d01/app/oracleas/OraHome_1/Apache/Apache/conf/httpd.conf
/d01/app/oracleas/OraHome_1/Apache/Apache/conf/appworx.conf
$AW_HOME /jre/bin
2.2. 设置环境变量
设置sosite
在文件$AW_HOME/site/sosite中增加如下脚本:
ORACLE_HOME=/d01/app/oracle/product/10.2.0/db_1
export ORACLE_HOME
ORACLE_SID=RETL
export ORACLE_SID
PATH=$PATH:$ORACLE_HOME/bin
2.3. 启动AppWorx进程
使用appworx用户登录linux,执行如下脚本
. /d01/app/appworx/MGMLDRMS/site/sosite
startso all
apachectl start
2.4. 关闭AppWorx进程
使用appworx用户登录linux,执行如下脚本
. /d01/app/appworx/MGMLDRMS/site/sosite
apachectl stop
stopso awcomm
2.5. AppWorx 客户端
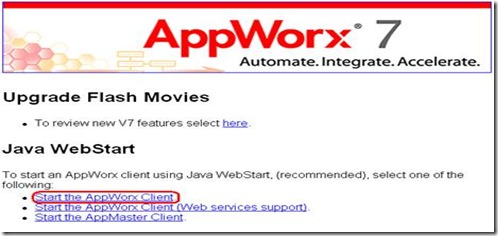
在浏览器中设置192.168.11.41为可信站点,并运行http://192.168.11.41:7777/MGMLDRMS/Intro.html
出现如下界面
点击第一个链接“Start the AppWorx Client”
1. 安装错误说明
1.1. 安装目录不对
安装目录(目标目录)缺省的目录就是当前目录,所以一定到准备放置AppWorx 的目录去执行安装脚本。不要到安装程序所在的目录执行,否则会出现找不到文件或目录的错误。
AppWorx Installaton directory [/d01/appworx/MGMLDRMS] –目标目录
CDROM mount point [/d01/d01/AppWorx70/V7] –安装程序目录
1.2. JAVA执行错
java -jar AxUnzip.jar -v AWFILES.zip data/awinstall.pl data/rainstall.pl data/inst.pl data/timezone_list.dat data/eng.msg
出现错误,不能识别参数。
请检查java版本,必要的时候,安装更新的版本。
1.3. uncompress执行错
cat LB_lxr73.Z|uncompress|tar xvf – c/gethost c/myzone c/change_awenv c/awnetex c/perlbash: uncompress: command not found
出现错误,不能识别参数。
使用root 用户执行
ln -s /usr/bin/gunzip /usr/bin/uncompress
1.4. 执行SQL脚本权限不够
需要给数据库用户足够的权限去创建和执行程序。
系统安装文档或安装目录下的SYSDBA.SQL文件中提供的权限清单不够。
具体权限请参考 2.2创建Oracle数据库用户
1.5. sqlplus或sqlldr命令不存在
需要安装完整版的数据库客户端,简化版或普通用户版的客户端没有sqlldr命令。
1.6. 客户端不能执行.jnlp的错误
点击“Start the AppWorx Client”,出现Client.jnlp的源程序,而不是执行Client.jnlp。
在本机保存Client.jnlp,使用本机最新版的javaws.exe打开,并保存这种打开方式。
如以上方法还不能解决,请安装Opera浏览器。
2. Open and Closed Issues for this Deliverable
Open Issues
如果数据库服务器与AppWorx服务器不在同一台主机上,客户端连接主机时会发生如下错误:
Setting classpath
Processing file ../temp/deploy.wsdd
Exception: AxisFault
faultCode: {http://schemas.xmlsoap.org/soap/envelope/}Server.userException
faultSubcode:
faultString: java.net.ConnectException: Connection refused
faultActor:
faultNode:
faultDetail:
{http://xml.apache.org/axis/}stackTrace:java.net.ConnectException: Connection refused
错误原因及解决方法,暂时还没确定。
Closed Issues
关于作者:
| 昵称:xiaojun.shen 档案信息: 联系方式:你可以通过xiaojun.shen@hand-china.com联系作者 点击查看xiaojun.shen发表过的所有文章... 本文永久链接: http://blog.retailsolution.cn/archives/317 |
对本文的评价:


在WP056_122006_Oracle_Retail.doc page5 提到:
在Retail环境下,AppWorx Master通常和RMS安装在同一主机上. 如果安装在同一主机上,客户端连接主机时会发生错误是否就不存在了?
Retail Specific Architecture
In an Oracle Retail environment, the AppWorx Master will usually reside on the main RMS server. The AppWorx data repository will use the main Oracle instance that is also used for storing your Retail data. This allows AppWorx to benefit from the high availability architecture used for your Retail applications as well as enabling business process acceleration links for your Oracle applications.
Remote agents also can be installed to control other Retail applications, such as RDF, RDM, or RDW that might run on other servers.
我在192.168.11.41这台机子上已经安装成功了。所以上述连接拒绝的错误可能是由于Appworx服务与数据库服务不在同一主机上的缘故。不过,还需要进一步验证。
==============
AppWorx Server (192.168.11.41)
==============
http://192.168.11.41:7777/MGMLDRMS/Intro.html
应用:SQLOPER/s0pass
数据库:appworx/appworx
AppWorx 的启动&关闭
==============================================
#Securt CRT 登陆到安装了AppWorx的服务器
#UNIX用户:oracle
#Apache的启停随RETL应用一起启停
#启动Appworx
. /d01/app/appworx/MGMLDRMS/site/sosite
startso all
#关闭Appworx
. /d01/app/appworx/MGMLDRMS/site/sosite
stopso all
#查看状态
awstat
AppWorx Server (192.168.11.41)
==============
http://192.168.11.41:7777/MGMLDRMS/Intro.html
应用:SQLOPER/HANDHAND